I have been fitting out forward to aft methodically working my way down the boat between each bulkhead. I have previously mentioned the berth soles and floor boards,
all of which were hand planned to achieve an accurate clearance fit to allow
easy removal/installation.
Lateral
shelving, main shelves in the cabin, hardwood trims to the berths and the step
were all manufactured from Sapele and glued in place. At the onset of the
forthcoming winter, the temperature at the build site is now becoming quite
cold, although it was possible to glue many of these items in the workshop,
however I did continued to carry out some gluing in situ on the boat. I store the epoxy in our heated utility room which maintains its workable viscosity. Before
application to the boat, a gentle warming of the wood with a heat gun
yielded good results, also the surface area of these assemblies is relatively quite
small, therefore temperature control in the immediate vicinity was fairly controllable by
the use of an electric fan heater, however this work was only undertaken on the
mildest days of no less than 5 degrees Celsius.
Berth soles and
cabin floor board fitted – step constructed and fitted – main cabin shelves
fitted and filleted – cockpit seats and locker covers in place.
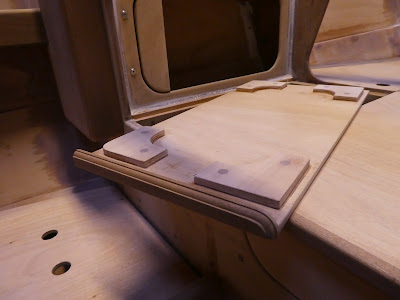
I have continued to make additions and alterations, customising the build to suite my intended use of the boat. The side locker covers and toilet
cover in the fore peak, were all fitted with locating lugs beneath to assist in replacing the covers and to prevent them from sliding off, I also installed a closure to the recess
beneath the toilet cover. All three items were then fitted with a hardwood
trim which I considered aesthetically pleasing and also served as a finger
purchase when opening.
An upturned
side locker cover reveals the locating lugs and hardwood trim detail.
The radiused end of the toilet closure can be seen below; this is glued and forms an
integral part of the cover structure.
The radiused end of the toilet closure can be seen below; this is glued and forms an
integral part of the cover structure.
At
this stage I also had to consider the installation of wiring cable runs, gas
bottle, battery/batteries, instrumentation and equipment. This is a small boat
and there is no room for an afterthought. I also manufactured small but
important removable items like the gas bottle platform. This was shaped to sit
snugly to the contours of the hull within one of the lockers, due consideration
was also given to the routing of the supply pipe.
The
cockpit seats were fitted and locker drains manufactured along with the cockpit
locker covers. I decided to reinforce these components by gluing doublers to
the undersides and installing an additional beam situated at mid span of each seat. The cockpit
locker covers have to be sufficiently watertight to withstand water ingress
when heeling. The architects solution and subsequent design of the drains is
worthy of mention, they are an excellent design and I expect that they will
function perfectly. The construction of the covers and drain requires the use of some flat bar and rod, for this I used 316 stainless steel.
The starboard side cockpit seat with the locker cover removed. The drain can be seen along one side and the
forward end of the locker, the design allows water to travel in either
direction. The aft exit drains into the motor well and forward sloping drain into the cockpit which, also drains into the motor well. The
cockpit sole has not yet been fitted to allow for painting beneath. The two
6mm steel rods spanning the drain toward either end provide support to the
locker cover when fitting and work very well. The covers will be securely locked
with a hasp, staple and padlock fitted central to the cockpit edge of the cover.
Upturned locker
cover showing the doublers fitted to provide additional stiffness and the
stainless steel locating strip screwed from beneath. Also in addition to the architects
design, I continued the hardwood trim along the aft end of the cover and formed a radius on the corner.
A view from
the transom showing the locker covers in place and the outboard motor well. The motor well cover and floor boards on either side will be glued and filleted once the compartments beneath have been painted.


No comments:
Post a Comment